Wednesday, September 15, 2010

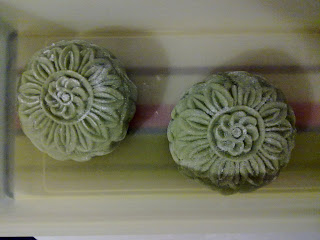
Pandan Ping Pei Lotus Mooncake


I have wanted to make ping pei mooncake for years but just couldn't find the courage to do so. As I'm afraid of failure and afraid nobody wanted to entertain it later. At first i thinking to give up making it for this year too as too costly to buy the ingredient of the lotus paste. If fail everything will go to the dustbin like my previous Green tea swiss roll! With the courage of my husband..."nothing is perfect at first and practise make perfect". Therefore, yesterday during lunch time, i went to buy all ingredient including the mould to make the mooncake! Straight away, i make the mooncake on yesterday night too.

The skin is a bit too thick but the taste is very much like the commercial type too.

Hence comes the recipe for the Pandan ping pei mooncake

Ingredient
For the skin
225g Kof Fun
55g Shortening
300ml cold water
225 Icing sugar
20g Wheat flour
2 drop of pandan essence

For the filling
600g Lotus paste

Method:-
1. Mix koh fun, wheat flour, icing sugar and shortening
2. Add in cold water and essence and mix well until it become a dough.
3. Rest for 10 mins
4. Meanwhile roll up 100g each of the lotus paste
5. Divide the dough about 80g each(will have some leftover)
6. Wrap the filling with the skin and put into the mooncake mould. then press out.
* i used the modern mooncake mould as no need to knock on the table!

Ribena Cheesecake


Last Friday, 10th Sep is my father in law birthday, but i don't have time to bake a cake for him as never in mind to bake a cake as we are going to Bukit Tinggi for our family trip. While having dinner together only we realise that none of us bought a cake for my father in law. At that time, i told my husband that i'll bake a cake for your father on Sunday as a replacement.

On Sat's night after an evening shopping at Sunway pyramid, i felt very tired. Thinking to give up to bake the cake. Hoping everybody will forget on my promise. But i just can't feel right. therefore, i take out the cream cheese to cold to room temperature while making my daugther to sleep. Right after my daugther fell to sleep, i quickly start on my mission on this Ribena Cheesecake as i thought cheesecake is more easier to make as no baking time is required.

i found this recipe from Happy Home Baking.

Crust:
180g digestive biscuits, finely crushed (Original call for 150g)
100g butter, melted (original called for 60g)

Filling:
100ml water
20g (2 tablespoons) gelatin powder (Should reduce to 1.5tbsp as the cheesecake turned out to be very jelly type)
250g cream cheese, soften at room temperature
75g caster sugar
250ml (1 cup) natural plain yogurt
75ml Ribena blackcurrant juice cordial (Should add more as i hardly can taste the Ribena flavour)


Method:
For the Crust
1. To make the crust, combine crushed digestive biscuits and melted butter together in a mixing bowl. With the back of a spoon, press the biscuit crumbs onto the base of the prepared pan. Chill in the freezer compartment for at least 1 hour.

For the filling
1. Pour the water into a bowl and sprinkle in the gelatin (without stirring with a spoon). Set aside to allow the gelatin grains to swell (10 mins) before setting the bowl over a pot of simmering hot water. Stir with a spoon and once the gelatin melts, remove the bowl from the pot and set aside to cool to room temperature.
2. With an electric mixer, beat cream cheese and sugar together until smooth. Add in the gelatin solution and yogurt, beat till the mixture turns smooth.
3. Divide mixture evenly into two bowls. Add 75ml of Ribena into one of the bowls and mix well with a spatula.
4. Spoon the two mixtures in alternate blobs into the chilled crust. Level top and swirl with a knife through the mixture to create a marble effect. Refrigerate for overnight.

Green Tea Ice Cream


Before I attempt to make this green tea ice cream, i have successfully make the Vanilla ice cream and "Cream n Cookies" ice cream without a ice cream maker. quite nervous at the beginning as most of the recipe i found for the green tea ice cream require a ice cream maker. But after i read thru Blessed Homemaker blog which she making this green tea ice cream without the ice cream maker, i have the couraged to do so also.

therefore, during the Raya holidays, i make this green tea ice cream. I can say it quite successful as the texture turned out to be creamy and not icy. The recipe of this green tea ice cream i get from Kitchen corner blog which i reduce to half as i don't have enough whipping cream store in the fridge. But i intend to make this ice cream again during the coming weekend! cheers

Ingredients (Original version)
250ml whole milk
150g sugar
Pinch of salt
500ml heavy cream
4 teaspoons matcha
6 large egg yolks

Method

1. Warm the milk, sugar and salt in a medium saucepan.
2. Pour the cream into a large bowl and whisk in the green tea powder. Set a mesh strainer on top.
3. In a separate medium bowl, whisk together the egg yolks.
4. Slowly pour the warm mixture into the egg yolks, whisking constantly, then scrape the warmed egg yolks back into the saucepan.
5. Stir the mixture constantly over medium heat with a heatproof spatula or wooden spoon, scraping the bottom as you stir, until the mixture thickens and coats the spatula.
6. Pour the custard through the strainer and stir it into the cream, then whisk it vigorously until custard is frothy to dissolve the green tea powder. Stir until cool over an ice bath.
7. Chill the mixture thoroughly in the refrigerator for about 3-4 hours, then take out from the freezer and beat with the electric mixer and re-freeze again for another 3-4 hours and beat again with the electric mixer before pour into a container and freeze for overnight

Ham and Cheese Bread

Actually this bread has been baked a week ago, and i'm feeling lazy to update and upload due to limited internet accessibility and Raya holidays!

For this bread, the outlook is not attractive at all so i don't have the mood to really post the ingredient here. However, the taste of bread is still there. Luckily the ham and the cheese smell is so strong so the bread still can be edible. hahaha Will try to bake again in the future

Tuesday, August 24, 2010

Green Tea Cake


Green tea cake

During my birthday, my husband bought me a green tea cake with red bean paste, which i found it so delicious. Important is my daughter loves to eat the cake too. As you know small children tend to be picky in eating. I remembered i saw one of the recipe of the same green tea cake with red bean paste in one of the Flavour magazine. Therefore, without wasting time, i followed the recipe and bake the cake once i got hold all the ingredient. So sad to say that this cake turned out to be unsuccessful. My heart sank as I've planned to bake this cake for my daugther and husband birthday sometimes next month. The cake flavour is there but the texture is a bit wet and heavy. i guess it has to do with how I beat the egg whites. Since their birthday still a month ahead, i guess i still have time to practice. Hope my next baking will turn out to be successful then i will post the recipe here.


Raisin bun

I purposely bake this bread for my daughter as she loves to eat bread so much. Plus raisin is her favourite too. I've got the recipe from Daily Delicious blog. The bread turn out to be nice just the process is a bit messy especially after i pouring the custard and raisin. i got difficulty to roll it up. Later, when i cut the roll into 6 pieces, ouch... too much custard leaking out. The whole table turned very messy with all the custard batter.

Nevertheless, it still a very nice raisin bun to have for the breakfast: 2 for myself, 2 for husband, 1 for my daughter and the other one is for my mum in law. I intend to bake it again :)

9 Layer Cake


I like to eat 9 layer cake. However never bother to know how is the process until I saw the recipe note from Florence blog. Told myself should give it a try. Overall the taste is good but the texture of the kueh is too sticky until i had hard time to cut it! i guess i know where has gone wrong... should use lesser water. The recipe is called for 560 - 750 ml of water. i selected 700ml which is too sticky for me. i guess for next time i should try to 560ml only. Will update the result later